In this post I’m documenting how to deploy Elasticsearch and use several AWS services to have a secure and flexible solution. I started building my own infrastructure as a test environment while developing Search Ops, an iOS app that lets you query Elasticsearch and I’ve put together steps how to reproduced the environment.
Building infrastructure on EC2
AWS as a huge array of services and in this demonstration I’m using Route53, API Gateways, Lambdas and EC2 instances. The EC2 instances with EBS storage provide the host for Elasticsearch and Kibana. This solution allows me to turn off the EC2 instance, to persist the data and keep costs low.
Architecture
I’ve used a number of AWS Services to build a solution that can scale, and is partially serverless (API Gateway & Lambdas).

Using Route53, API Gateways, Lambdas, and EC2 you can build a flexible solution, with SSL connectivity and great observability across the stack.
In this approach, I’ve created two API Gateways linked to two subdomains in Route53, which are mapped to two different AWS Lambdas.
search.->elasticsearch.servicekibana.->kibana.service
By having two API Gateways, you can apply different policies to each service (ElasticSearch & Kibana) - as an example, limit public access to ElasticSearch, or drop traffic without an authorisation header before it hits your EC2 instance, reducing the load on your host.
Deploy an EC2
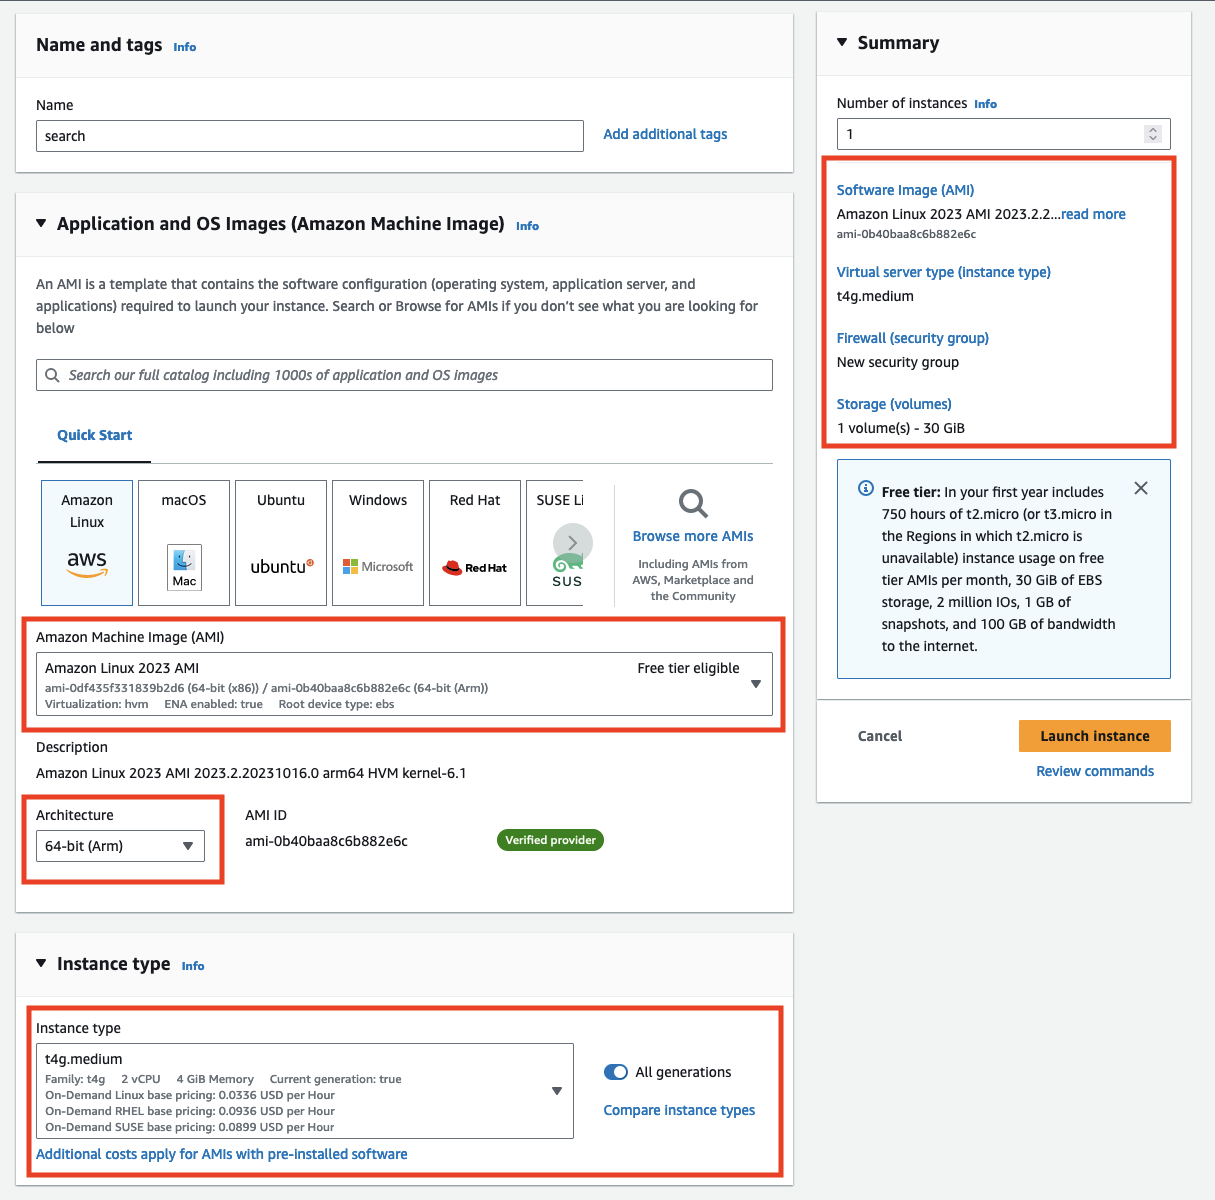
EC2 Instance
To get started, create an EC2 instance using the Amazon Linux 2023 AMI on a t4g.medium instance. The t4g instances are of ARM architecture, which gives better performance per cost on AWS. ElasticSearch works perfectly fine on ARM too!
Storage
Give the instance 30GB of storage. After installing ElasticSearch & Kibana, and accounting for OS use, there is about 70% disk space left, so this could be smaller.
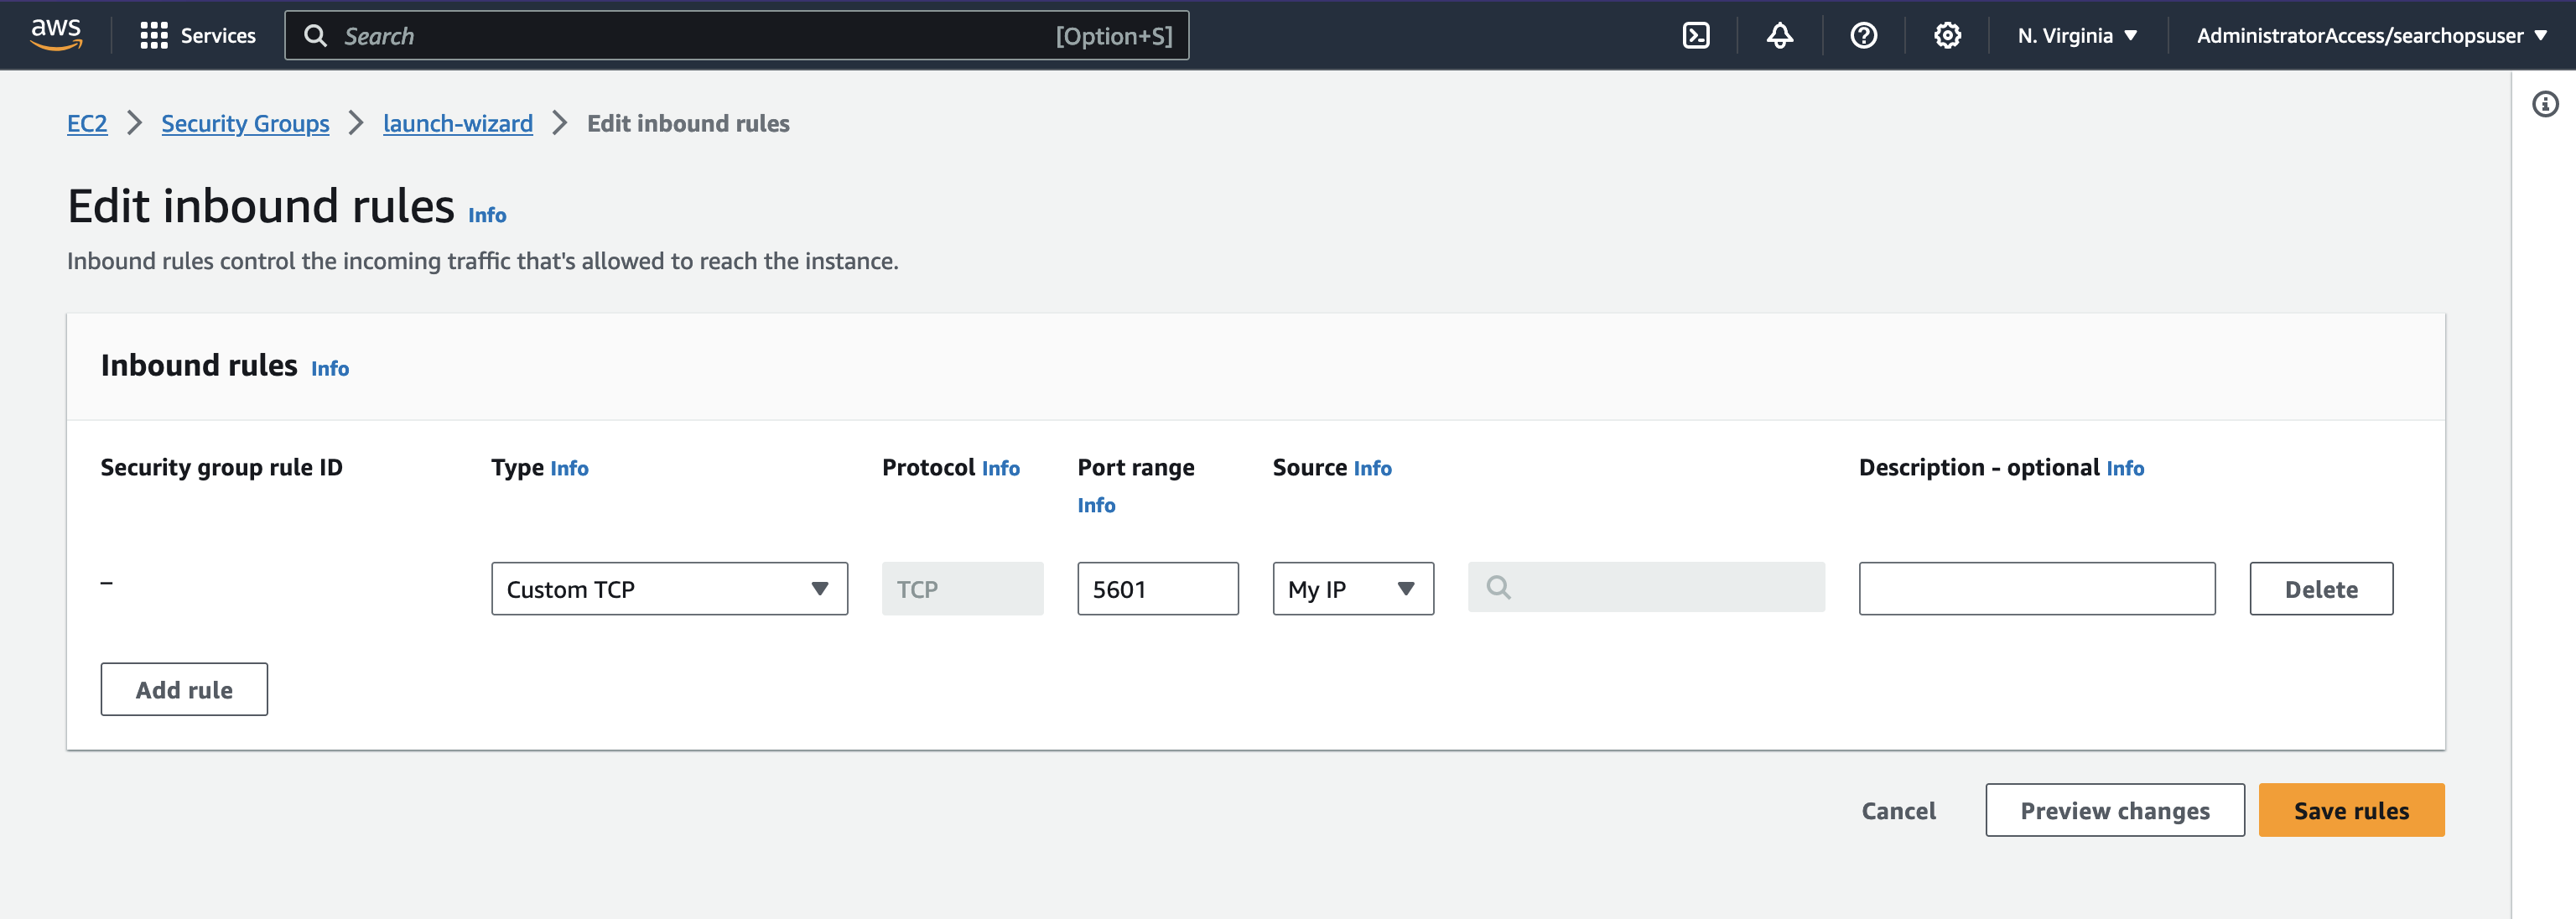
Security Group
Create a new security group that allows traffic from your IP address.
How this looks in the UI, creating the EC2 instance:
Or via the AWS CLI:
aws ec2 run-instances   --image-id resolve:ssm:/aws/service/ami-amazon-linux-latest/al2023-ami-kernel-6.1-x86_64  \
                        --count 1 \
                        --instance-type "t4g.medium" \
                        --key-name {KEY NAME}  \
                        --subnet-id {SUBNET} \
                        --security-group-ids {SECURITY GROUP} \
                        --block-device-mapping "[ { \"DeviceName\": \"/dev/xvda\", \"Ebs\": { \"VolumeSize\": 30 } } ]"
To note, you’ll need to have the AWS CLI installed locally, with subnet and security groups pre-defined within AWS to do this.
Installing ElasticSearch & Kibana
Once we are up and running with our EC2 we need to install ElasticSearch and Kibana on the EC2 instance.
I’ve created a bash script that configures the official mirror for ElasticSearch, and installs ElasticSearch and Kibana. The script then sets up the services to start on boot.
View bash script↕Close↑
#!/bin/bash

## Install the elastic GPG Key
rpm --import https://artifacts.elastic.co/GPG-KEY-elasticsearch

## Add the package host to your yum repository
touch /etc/yum.repos.d/elastic.repo
cat << EOF > /etc/yum.repos.d/elastic.repo
[elastic]
name=Elastic repository for 8.x packages
baseurl=https://artifacts.elastic.co/packages/8.x/yum
gpgcheck=1
gpgkey=https://artifacts.elastic.co/GPG-KEY-elasticsearch
enabled=1
autorefresh=1
type=rpm-md
EOF

## Install ElasticSearch
yum install --enablerepo=elastic elasticsearch kibana -y

## Set ElasticSearch to start on boot
/bin/systemctl daemon-reload
/bin/systemctl enable kibana.service
/bin/systemctl enable elasticsearch.service

## Start ElasticSearch & Kibana
systemctl start kibana.service
systemctl start elasticsearch.service

## Reset the elastic password
esPass=$(/usr/share/elasticsearch/bin/elasticsearch-reset-password -u elastic -b -s)
echo $esPass > /root/elastic_password.txt
curl -k https://localhost:9200 -u elastic:$esPass
Open up Kibana and ElasticSearch to the world. This is okay, the EC2 is not publically available. The new security group made above should only allow your IP address via SSH.
#!/bin/bash

## Open Kibana to the world
cat << EOF >> /etc/kibana/kibana.yml
server.host: "0.0.0.0"
EOF

systemctl restart kibana.service
Video clip
I’ve put together a video clip of the bash script running. You’ll see that it executes all of the bash commands to install ElasticSearch and then runs a curl command to test that the instance is up.

I’m using webp as the video format above, with a resolution of 1000 by 484; a duration of 26 seconds, totaling 4.28 MB in size. I’m keen to make this website as light and accessible as possible. I’ve previously used AVIF for video clips but I’ve found some compatibility issues across browsers, desktop and mobile.
Validate setup
As well as seeing the above curl command execute, you can validate that the ports that ElasticSearch & Kibana use are open and listening by using nestat
netstat -tulpn | grep LISTEN

We can see ports 5601 and 9200 are open and listening for connections (as well as 9300 which is used for cluster management).
You can also open up the security group to your IP address (:5601) to see Kibana load.
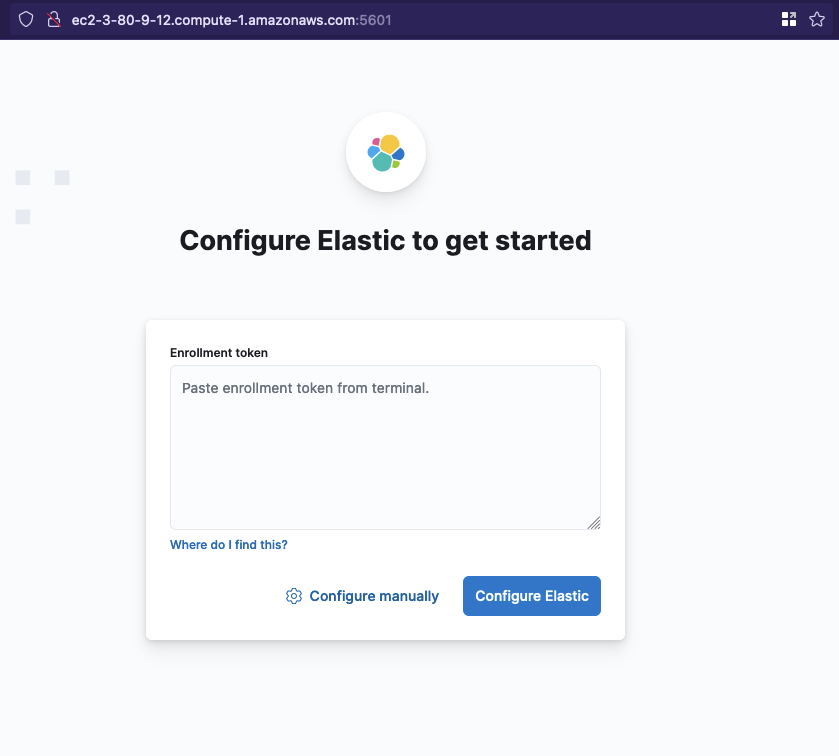
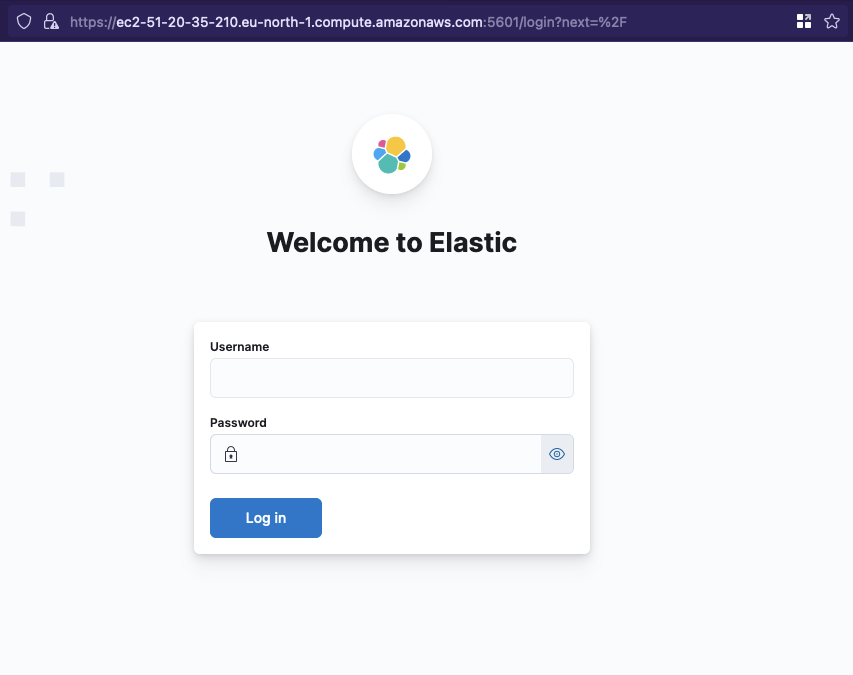
Then visit http://{EC2 DNS}:5601 in your browser
You will see an Kibana enrollment screen, we don’t need to take any action on this for the moment. Note that Kibana is running insecurely (http://)
Security on EC2
User Auth
ElasticSearch comes with a default username elastic. In the bash script above we reset the password and output the string to /root/elastic_password.txt. You need to retrieve the password to log in to Kibana.
Kibana Security
It’s best practice to upgrade the connection to use SSL, although ElasticSearch and Kibana will only be accessible via a Lambda inside the VPC. Kibana defaults to using an insecure HTTP connection, but you can swap this out to reuse the self-signed certificate ElasticSearch uses.
The bash script to do this is included below. To describe the steps though:
- Retrieve the Elasticsearch keystore password
- Export the certificate and key from the .p12
- Update group permissions so both Kibana and ElasticSearch services can read the certificate folder
#!/bin/bash

## Retrieve the password for the self generated certificate
ELASTIC_KEY_STORE_PASSWORD=$(/usr/share/elasticsearch/bin/elasticsearch-keystore show xpack.security.http.ssl.keystore.secure_password)

## Export the cert from the .p12
openssl pkcs12 -in /etc/elasticsearch/certs/http.p12 -clcerts -nokeys -out /etc/elasticsearch/certs/http.crt -passin pass:${ELASTIC_KEY_STORE_PASSWORD}
openssl pkcs12 -in /etc/elasticsearch/certs/http.p12 -out /etc/elasticsearch/certs/http.key -nodes -nocerts -passin pass:${ELASTIC_KEY_STORE_PASSWORD}

## Validates the certificate & Private Key
openssl verify -verbose -x509_strict -CAfile /etc/elasticsearch/certs/http_ca.crt /etc/elasticsearch/certs/http.crt
openssl rsa -check -noout -in /etc/elasticsearch/certs/http.key

## Create a group to combine ElasticSearch and Kibana access on the EC2 machine
## and add the elasticsearch and kibana user into the group
groupadd elkuser
gpasswd -a elasticsearch elkuser
gpasswd -a kibana elkuser

## Give the new group (elkuser) access to the
## elasticsearch folder and certificates
## ensure they are readable to the entire group
chown -R root:elkuser /etc/elasticsearch/certs
chown root:elkuser /etc/elasticsearch/
chmod 640 /etc/elasticsearch/certs/*

## Enable Kibana to use SSL and path for certificates
cat << EOF >> /etc/kibana/kibana.yml
server.ssl.enabled: true
server.ssl.certificate: /etc/elasticsearch/certs/http.crt
server.ssl.key: /etc/elasticsearch/certs/http.key
EOF

## Restart both services
systemctl restart kibana.service
systemctl restart elasticsearch.service
Viewing Kibana with SSL
You will now be able to visit Kibana using https://{EC2 Public DNS}:5601. Your browser will warn that the certificate is self signed.
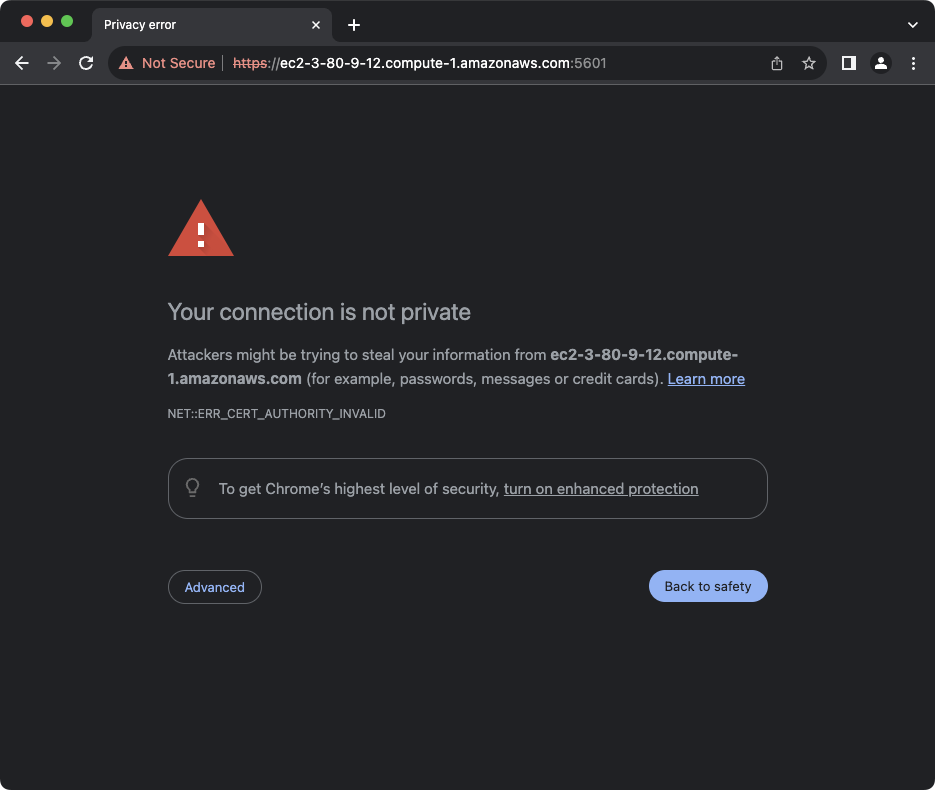
The connection is still using SSL with SHA-256 encryption though. You can proceed to view the page, and you’ll see the enrollment screen again. After further setup the certificate will only be used between the Lambdas and the EC2 instance, and you won’t receive these errors in the browser as the API Gateway provides its own SSL certificate.
Generate the Kibana enrollment token
To connect the two instances together, you can generate an enrollment token to add into Kibana
ELASTIC_ENROLLMENT_KEY=$(/usr/share/elasticsearch/bin/elasticsearch-create-enrollment-token -s kibana --url https://localhost:9200)
/usr/share/kibana/bin/kibana-setup --enrollment-token ${ELASTIC_ENROLLMENT_KEY}
systemctl restart kibana
You may get this error message in bash:
Failed to determine the health of the cluster. Unexpected http status [401], with exit code 65If you do, you need to restart the service: systemctl restart elasticsearch and try again
Then one last time, you can visit the public DNS of the EC2 instance, https://{EC2 DNS}:5601 to see the Kibana login page.
Lambda Deployment
Setup using Script
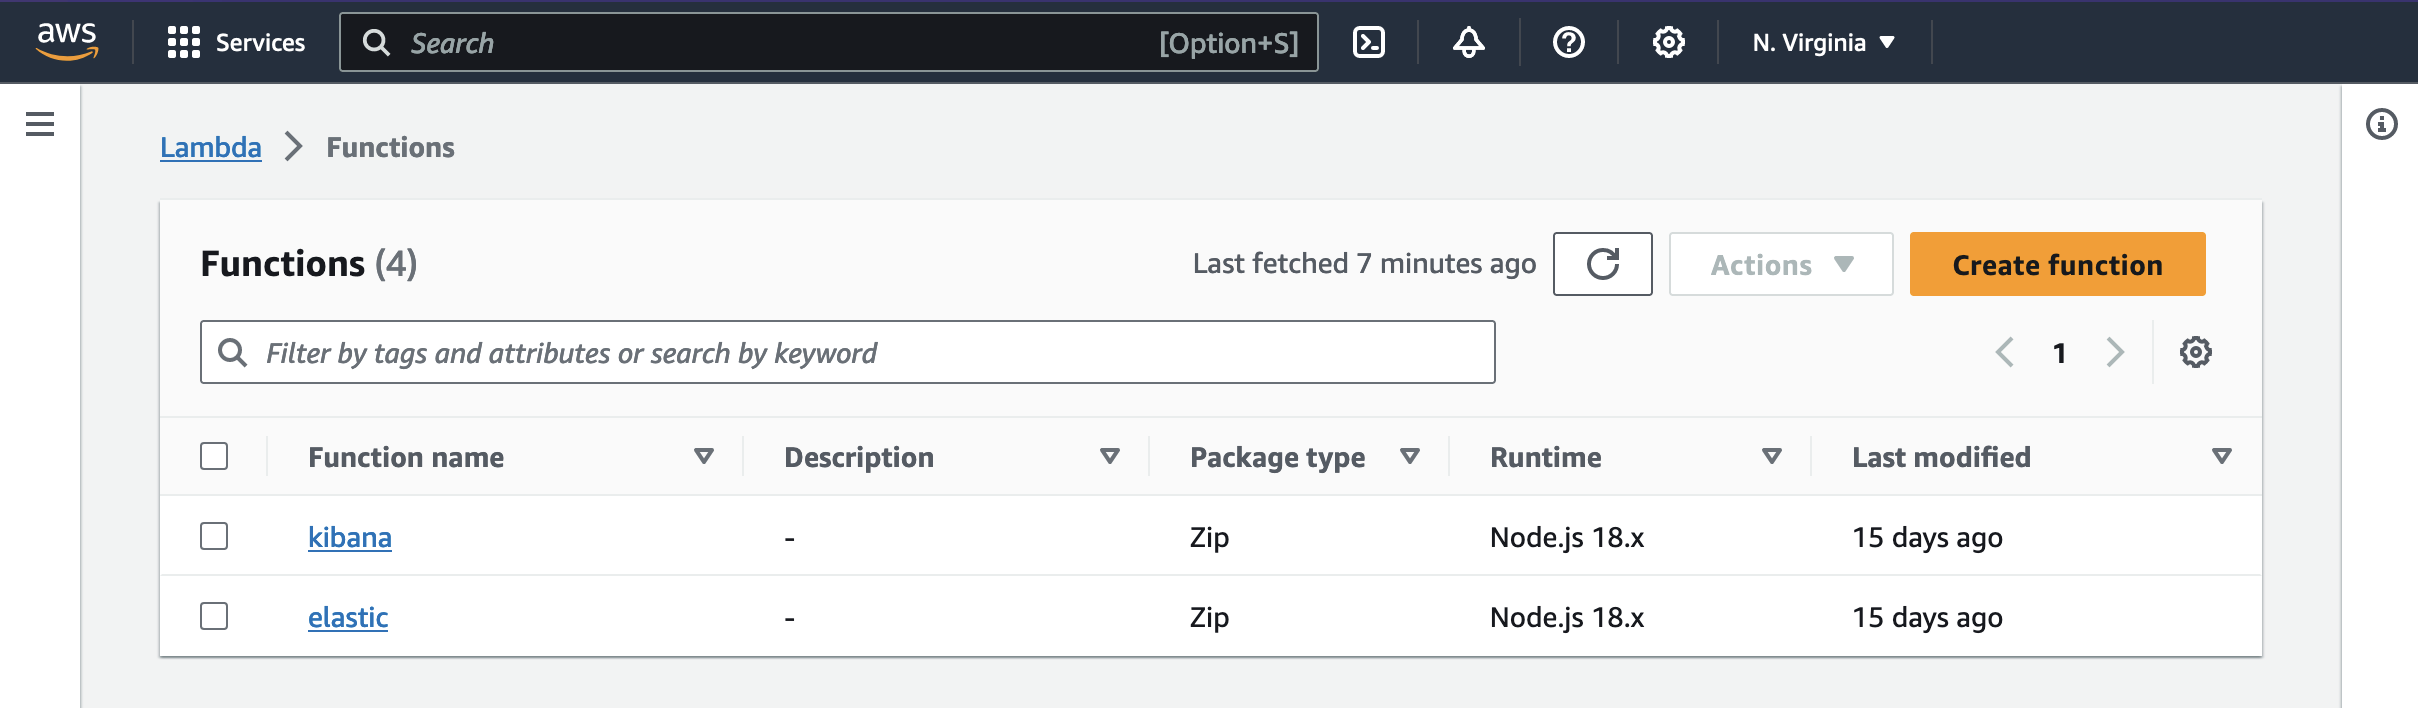
To begin we’ll setup two Lambdas to act as forwarders for the connections to ElasticSearch and Kibana.
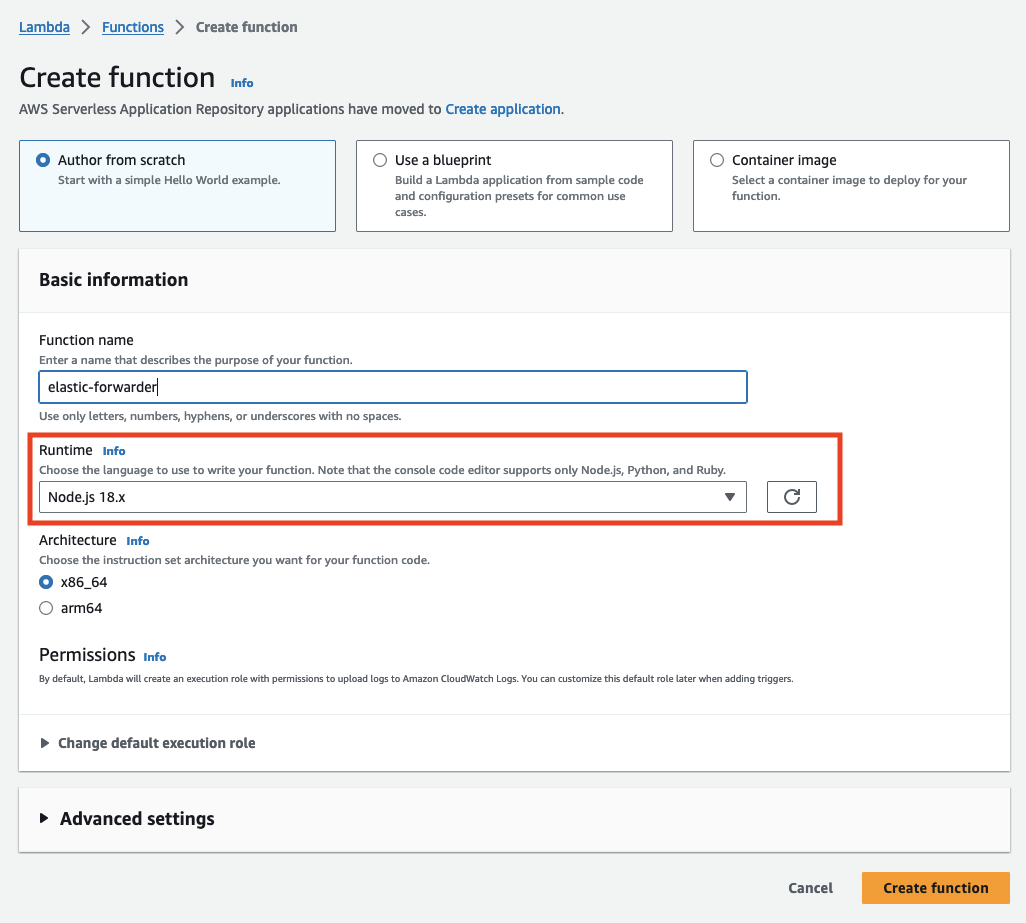
Copy in the contents from the script below into the Lambda
View Lambda Script (NodeJS 18.v)↕Close↑
| |
Lambda Environment Variables
The Lambda is designed to be generic to support any services running on EC2 within the VPC. The script looks for two environment variables, the host (including port), and whether the debug variable has been set.

The DEBUG environment variable acts as a flag to output the content from the service. It’ll attempt to deflate/decompress content as well.
// Content from the Lambda Script above
// Line 124
if(process.env.DEBUG === "TRUE"){
    console.log(response.headers)
    if (response.headers['content-encoding'] == "gzip"){
        const dezziped = zlib.gunzipSync(buffer);
        console.log(dezziped.toString())
    } else if (response.headers['content-encoding'] == "br") {
        const dezziped = zlib.brotliDecompressSync(buffer);
        console.log(dezziped.toString())
    } else {
        console.log(buffer.toString())
    }
}
As a result, you should end up with two AWS Lambdas, pointing at Kibana and ElasticSearch
API Gateway
Now lets create two API Gateways to act as the front door to the two Lambdas we have just created.
Updated AWS Interface!
I'm using the new API Gateway web interface, The screenshots may look slightly different to what you see on AWS initially. This will be the default from 30th October 2023 but you can switch to it using it by clicking the link at the top of the API Gateway screen.
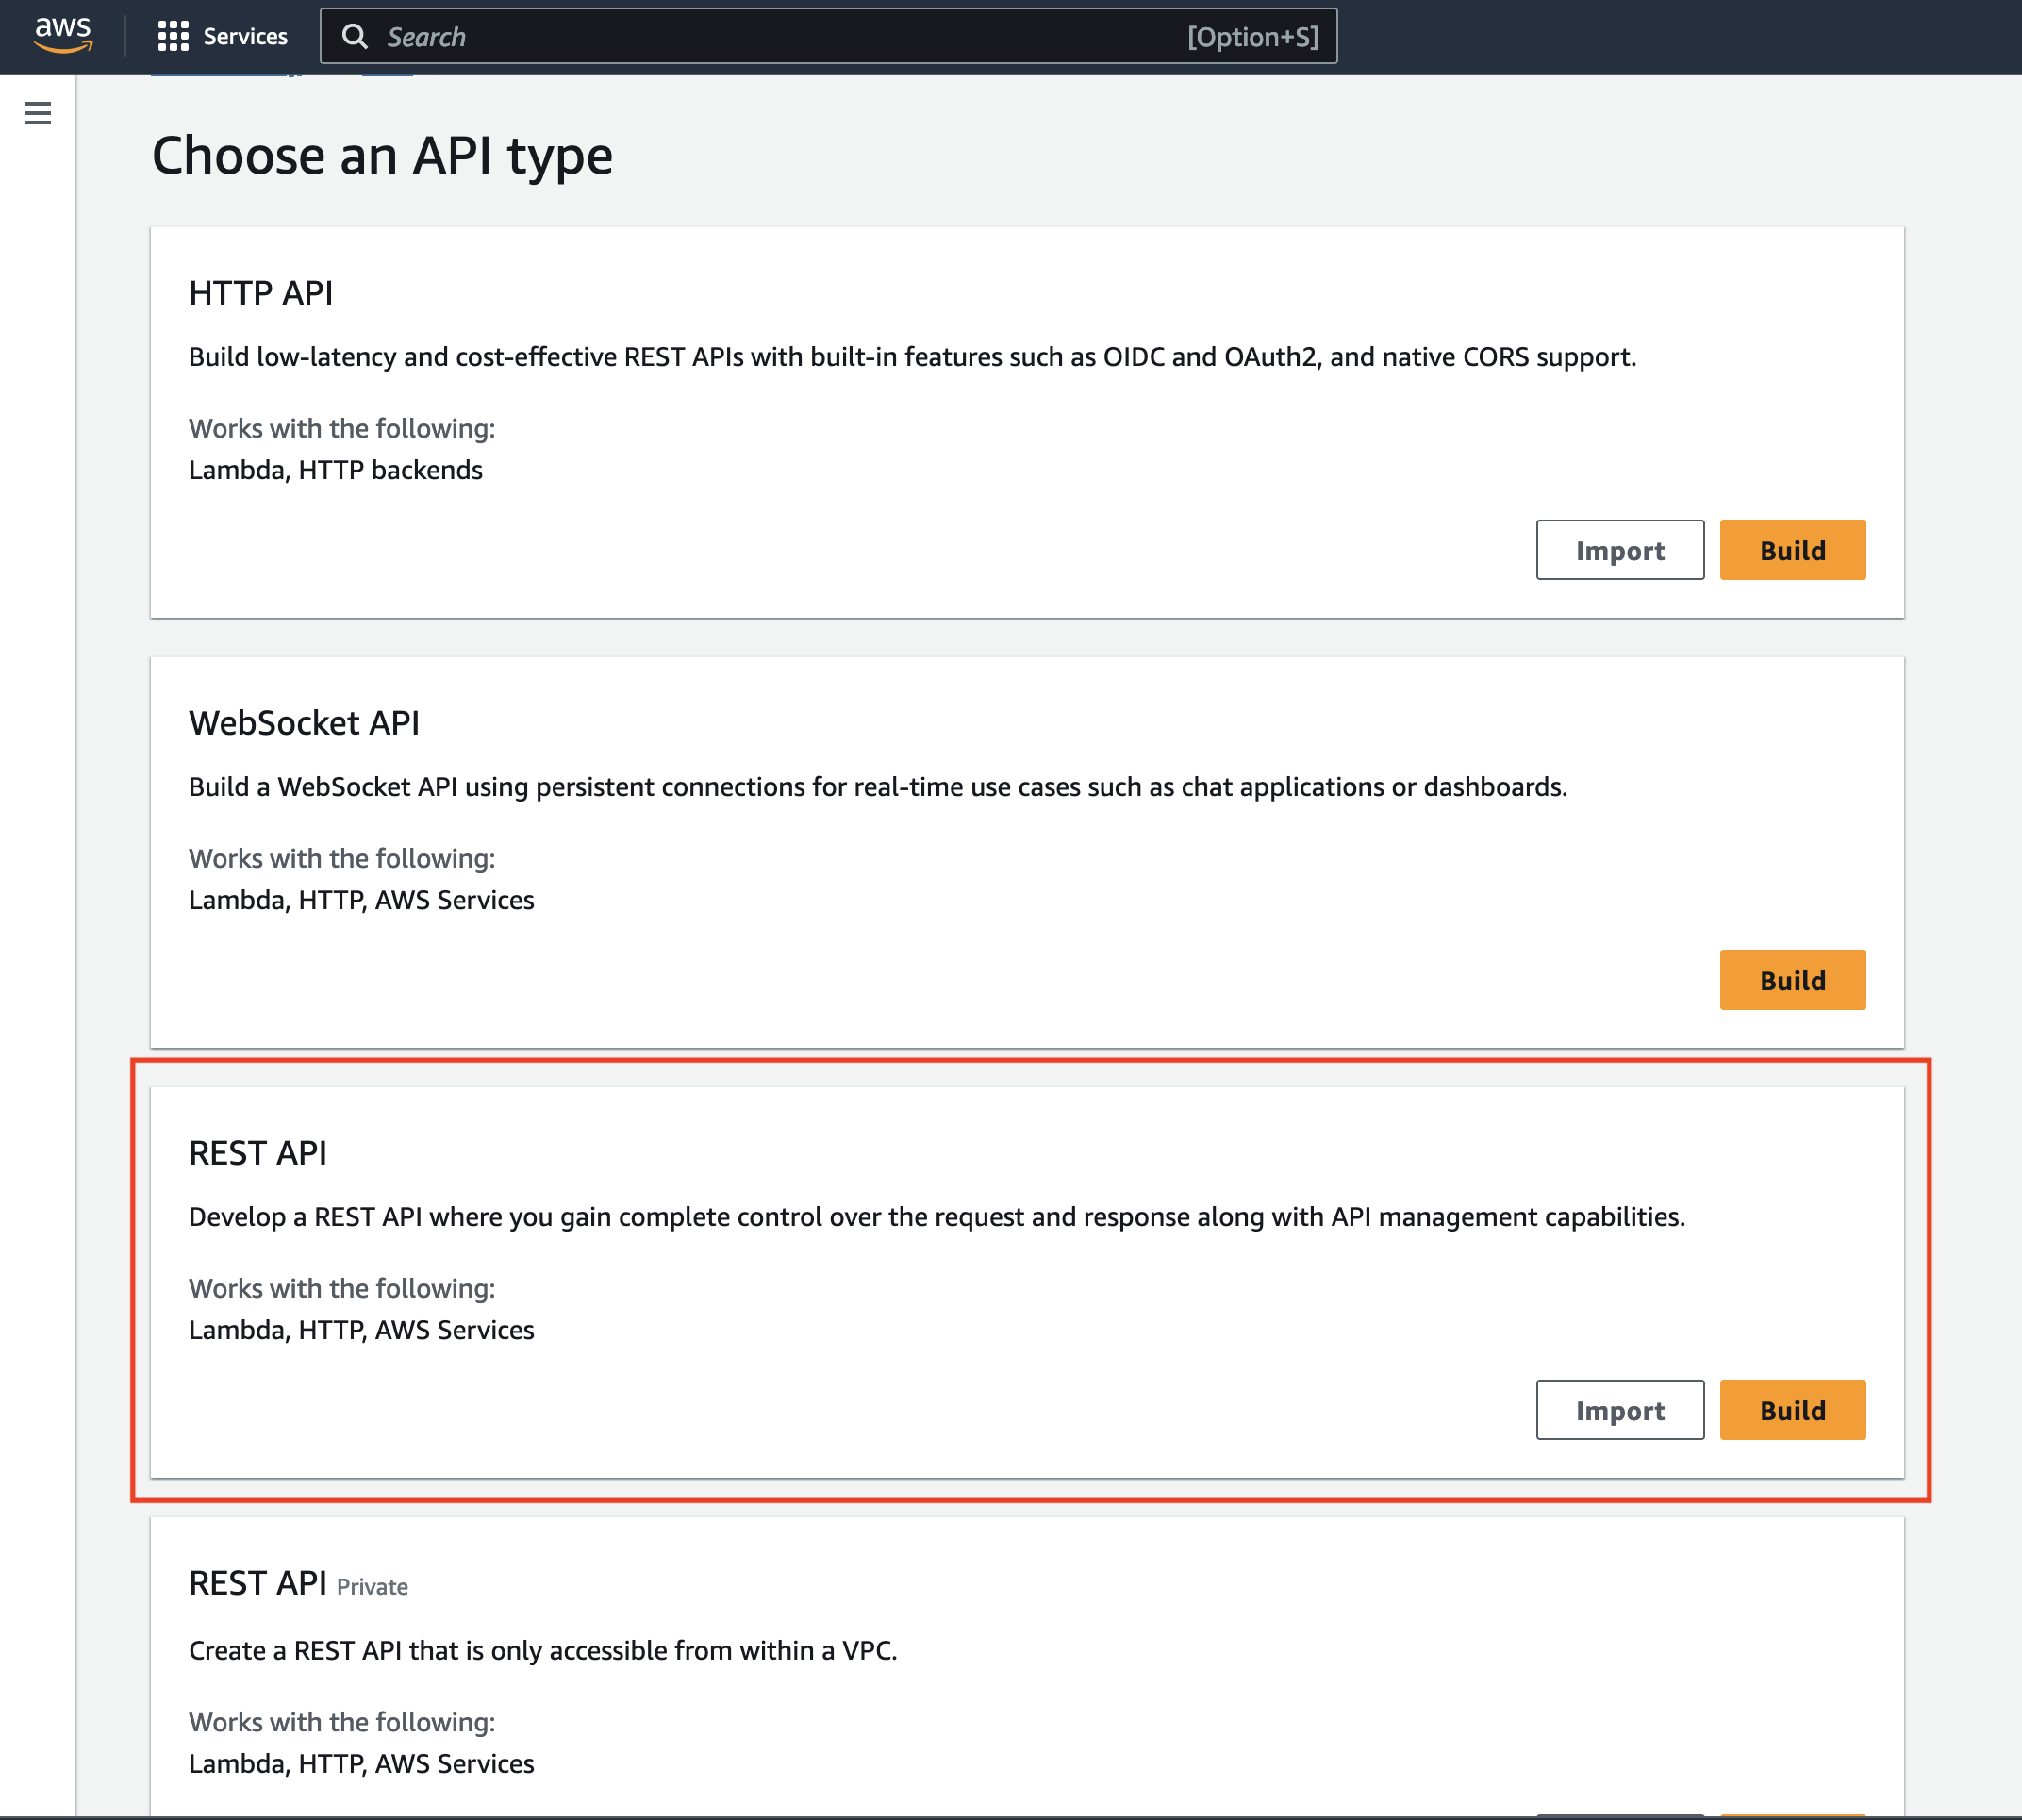
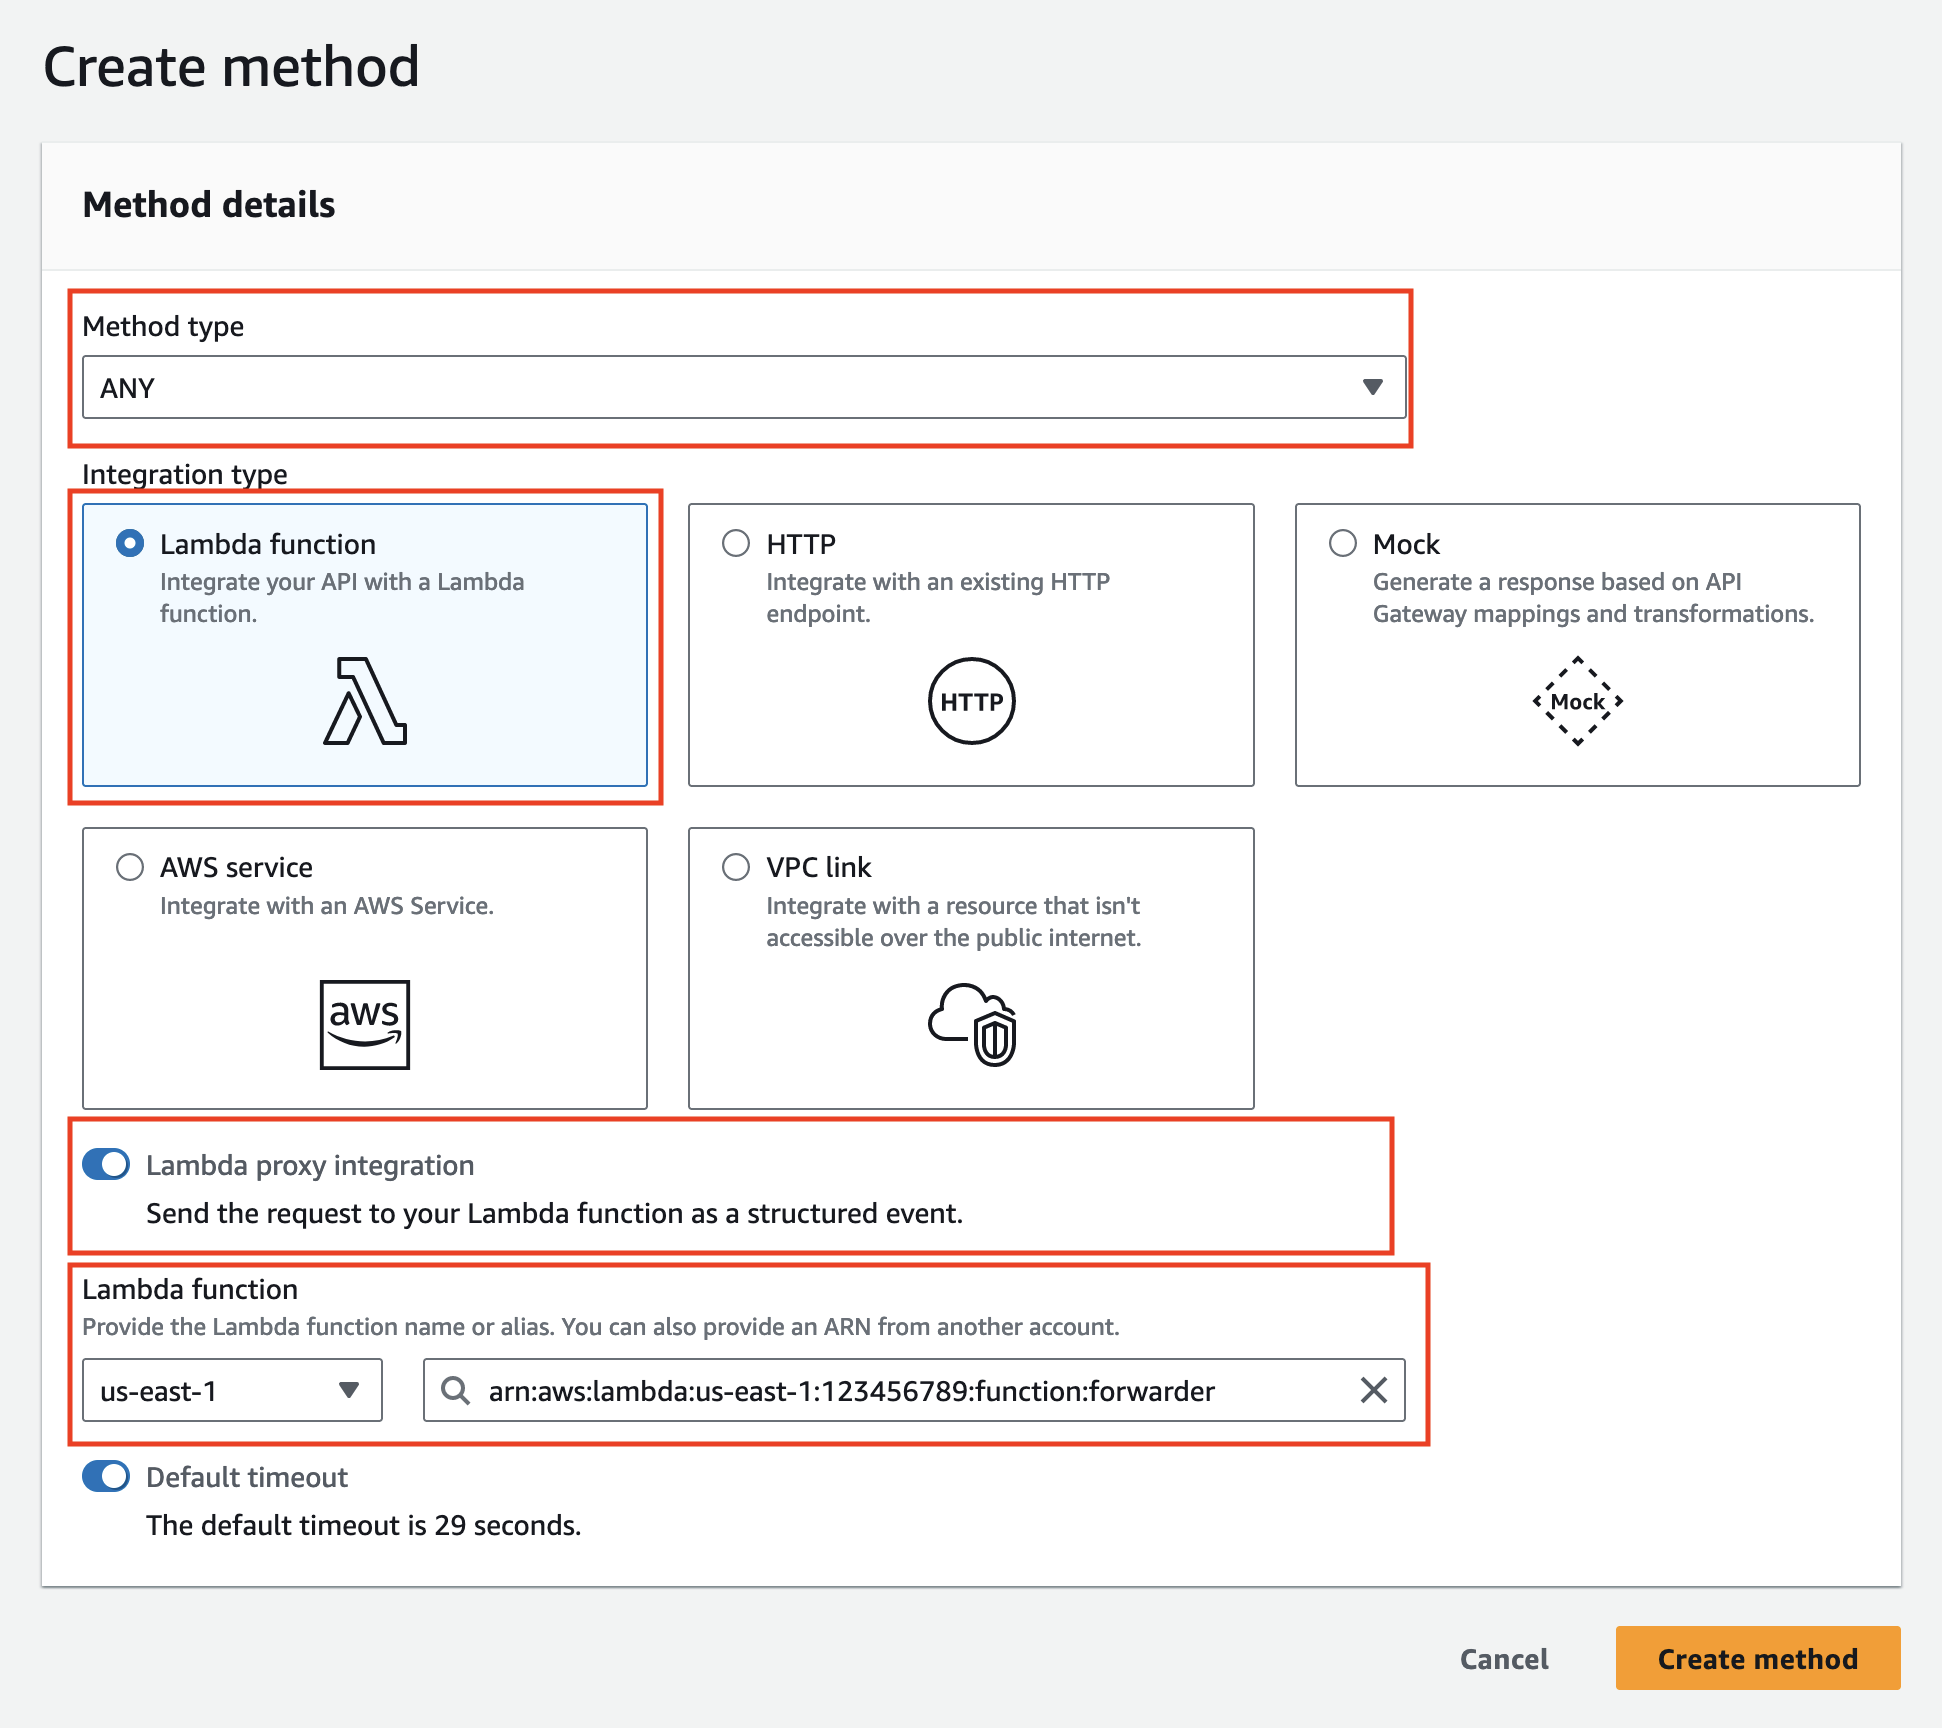
Create the regional API Gateways
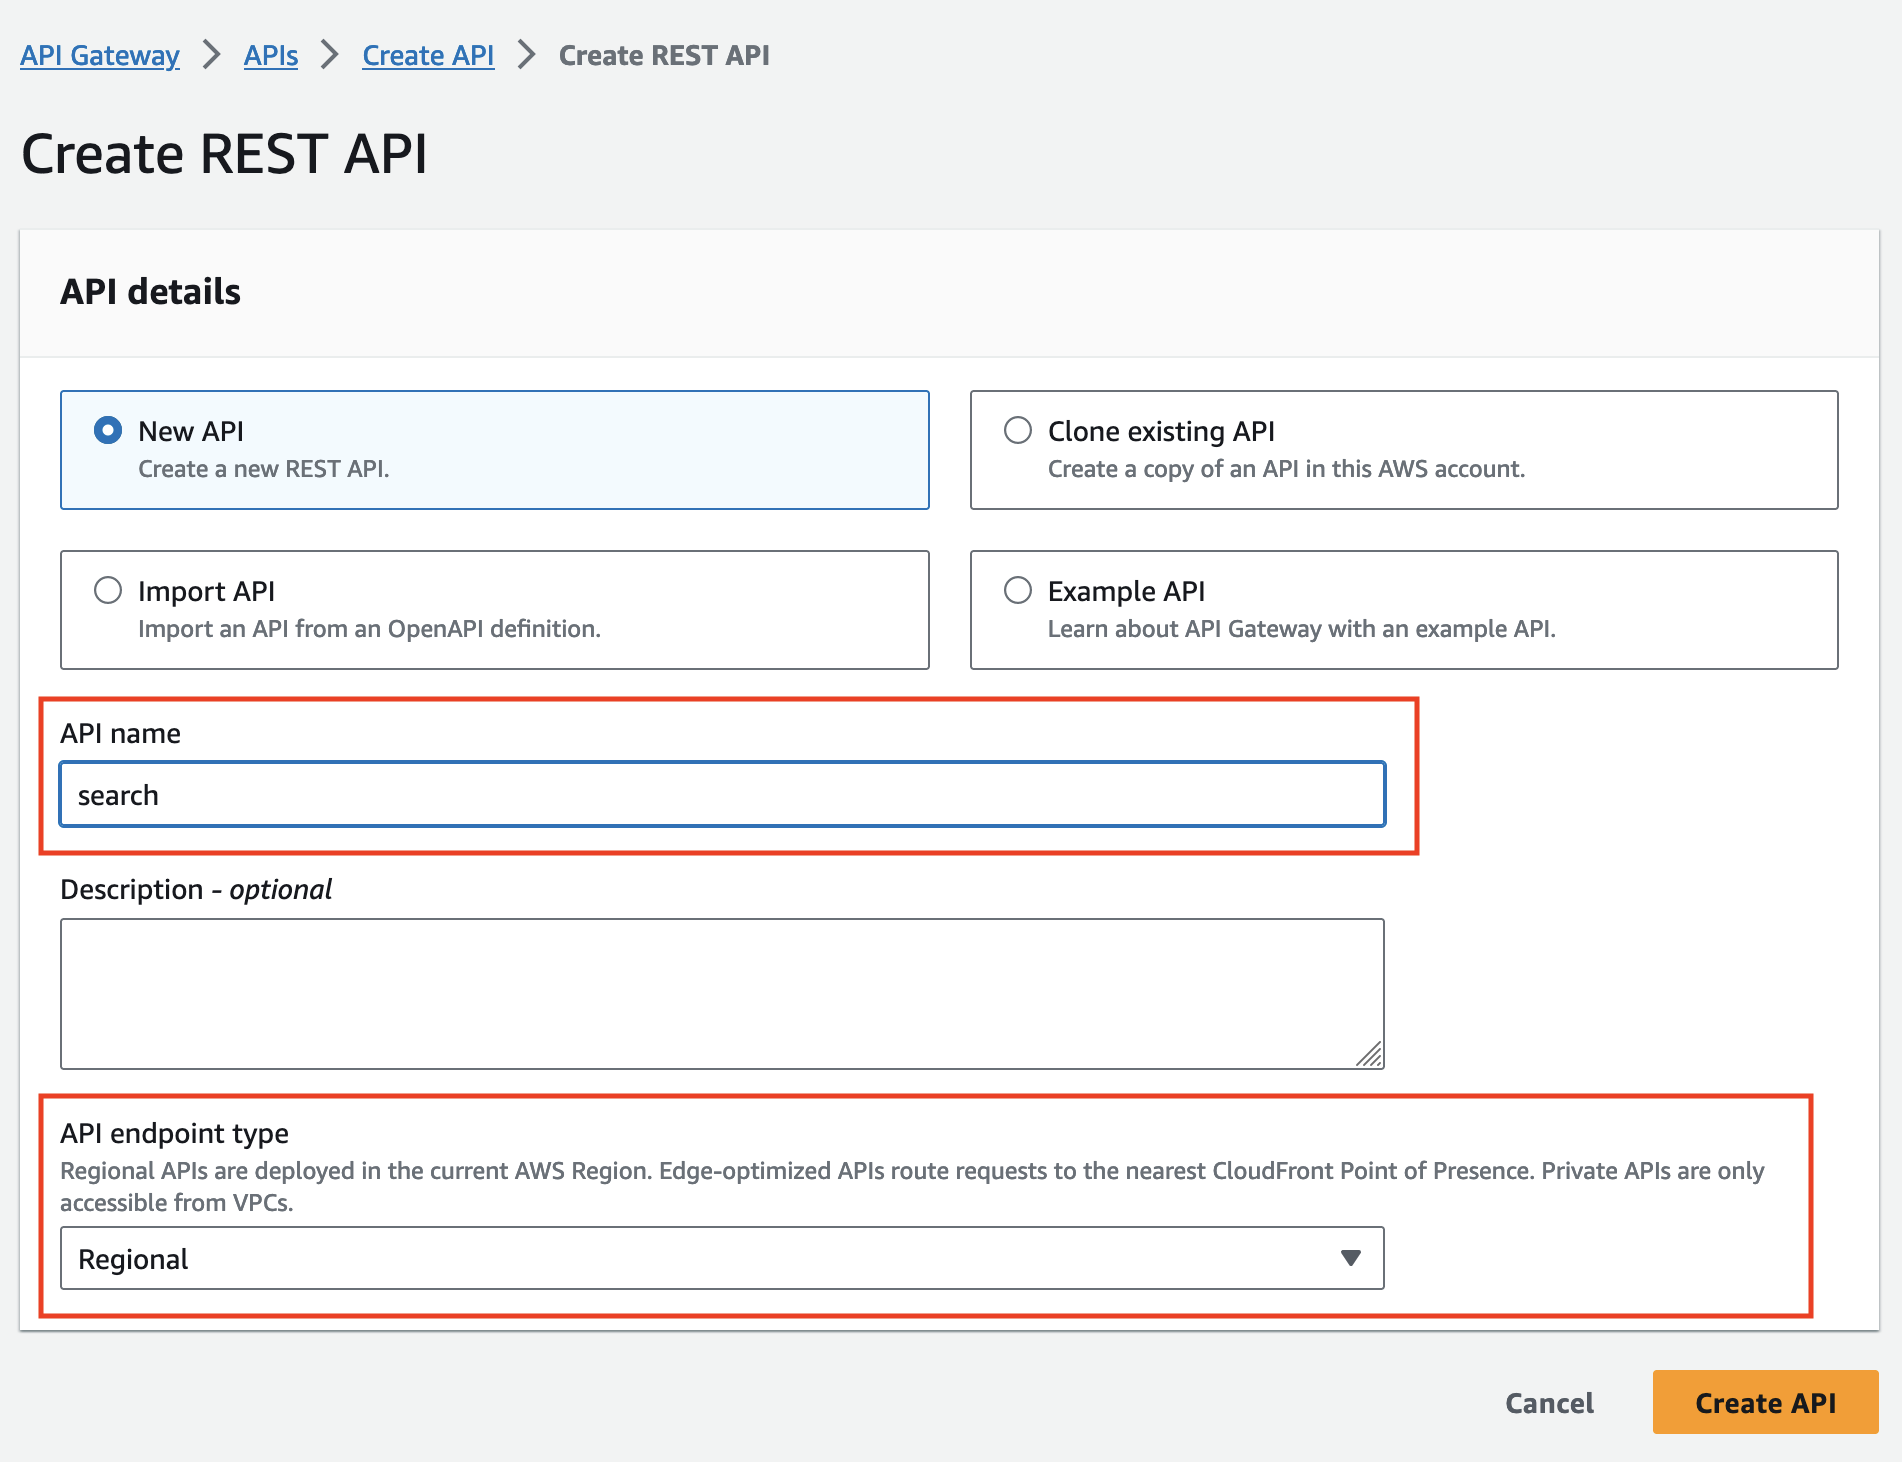
With a Lambda Method. Ensure you have enabled the proxy integreation to the Lambda so the forwarders get the full HTTP context.
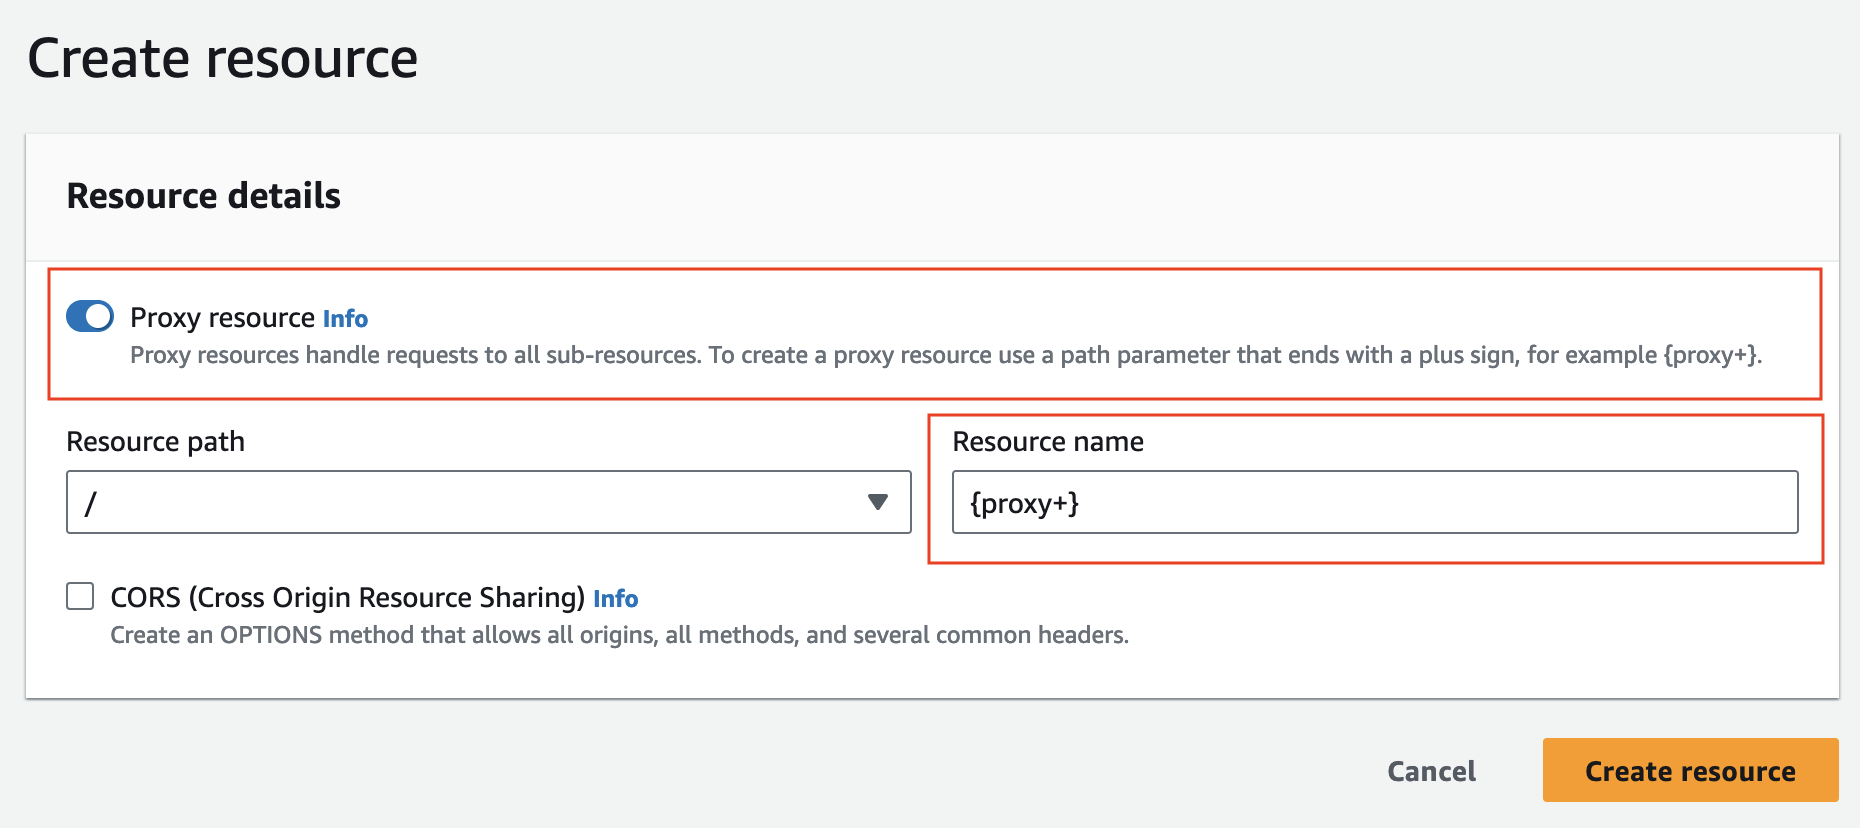
Create two endpoint resources:
Final result:
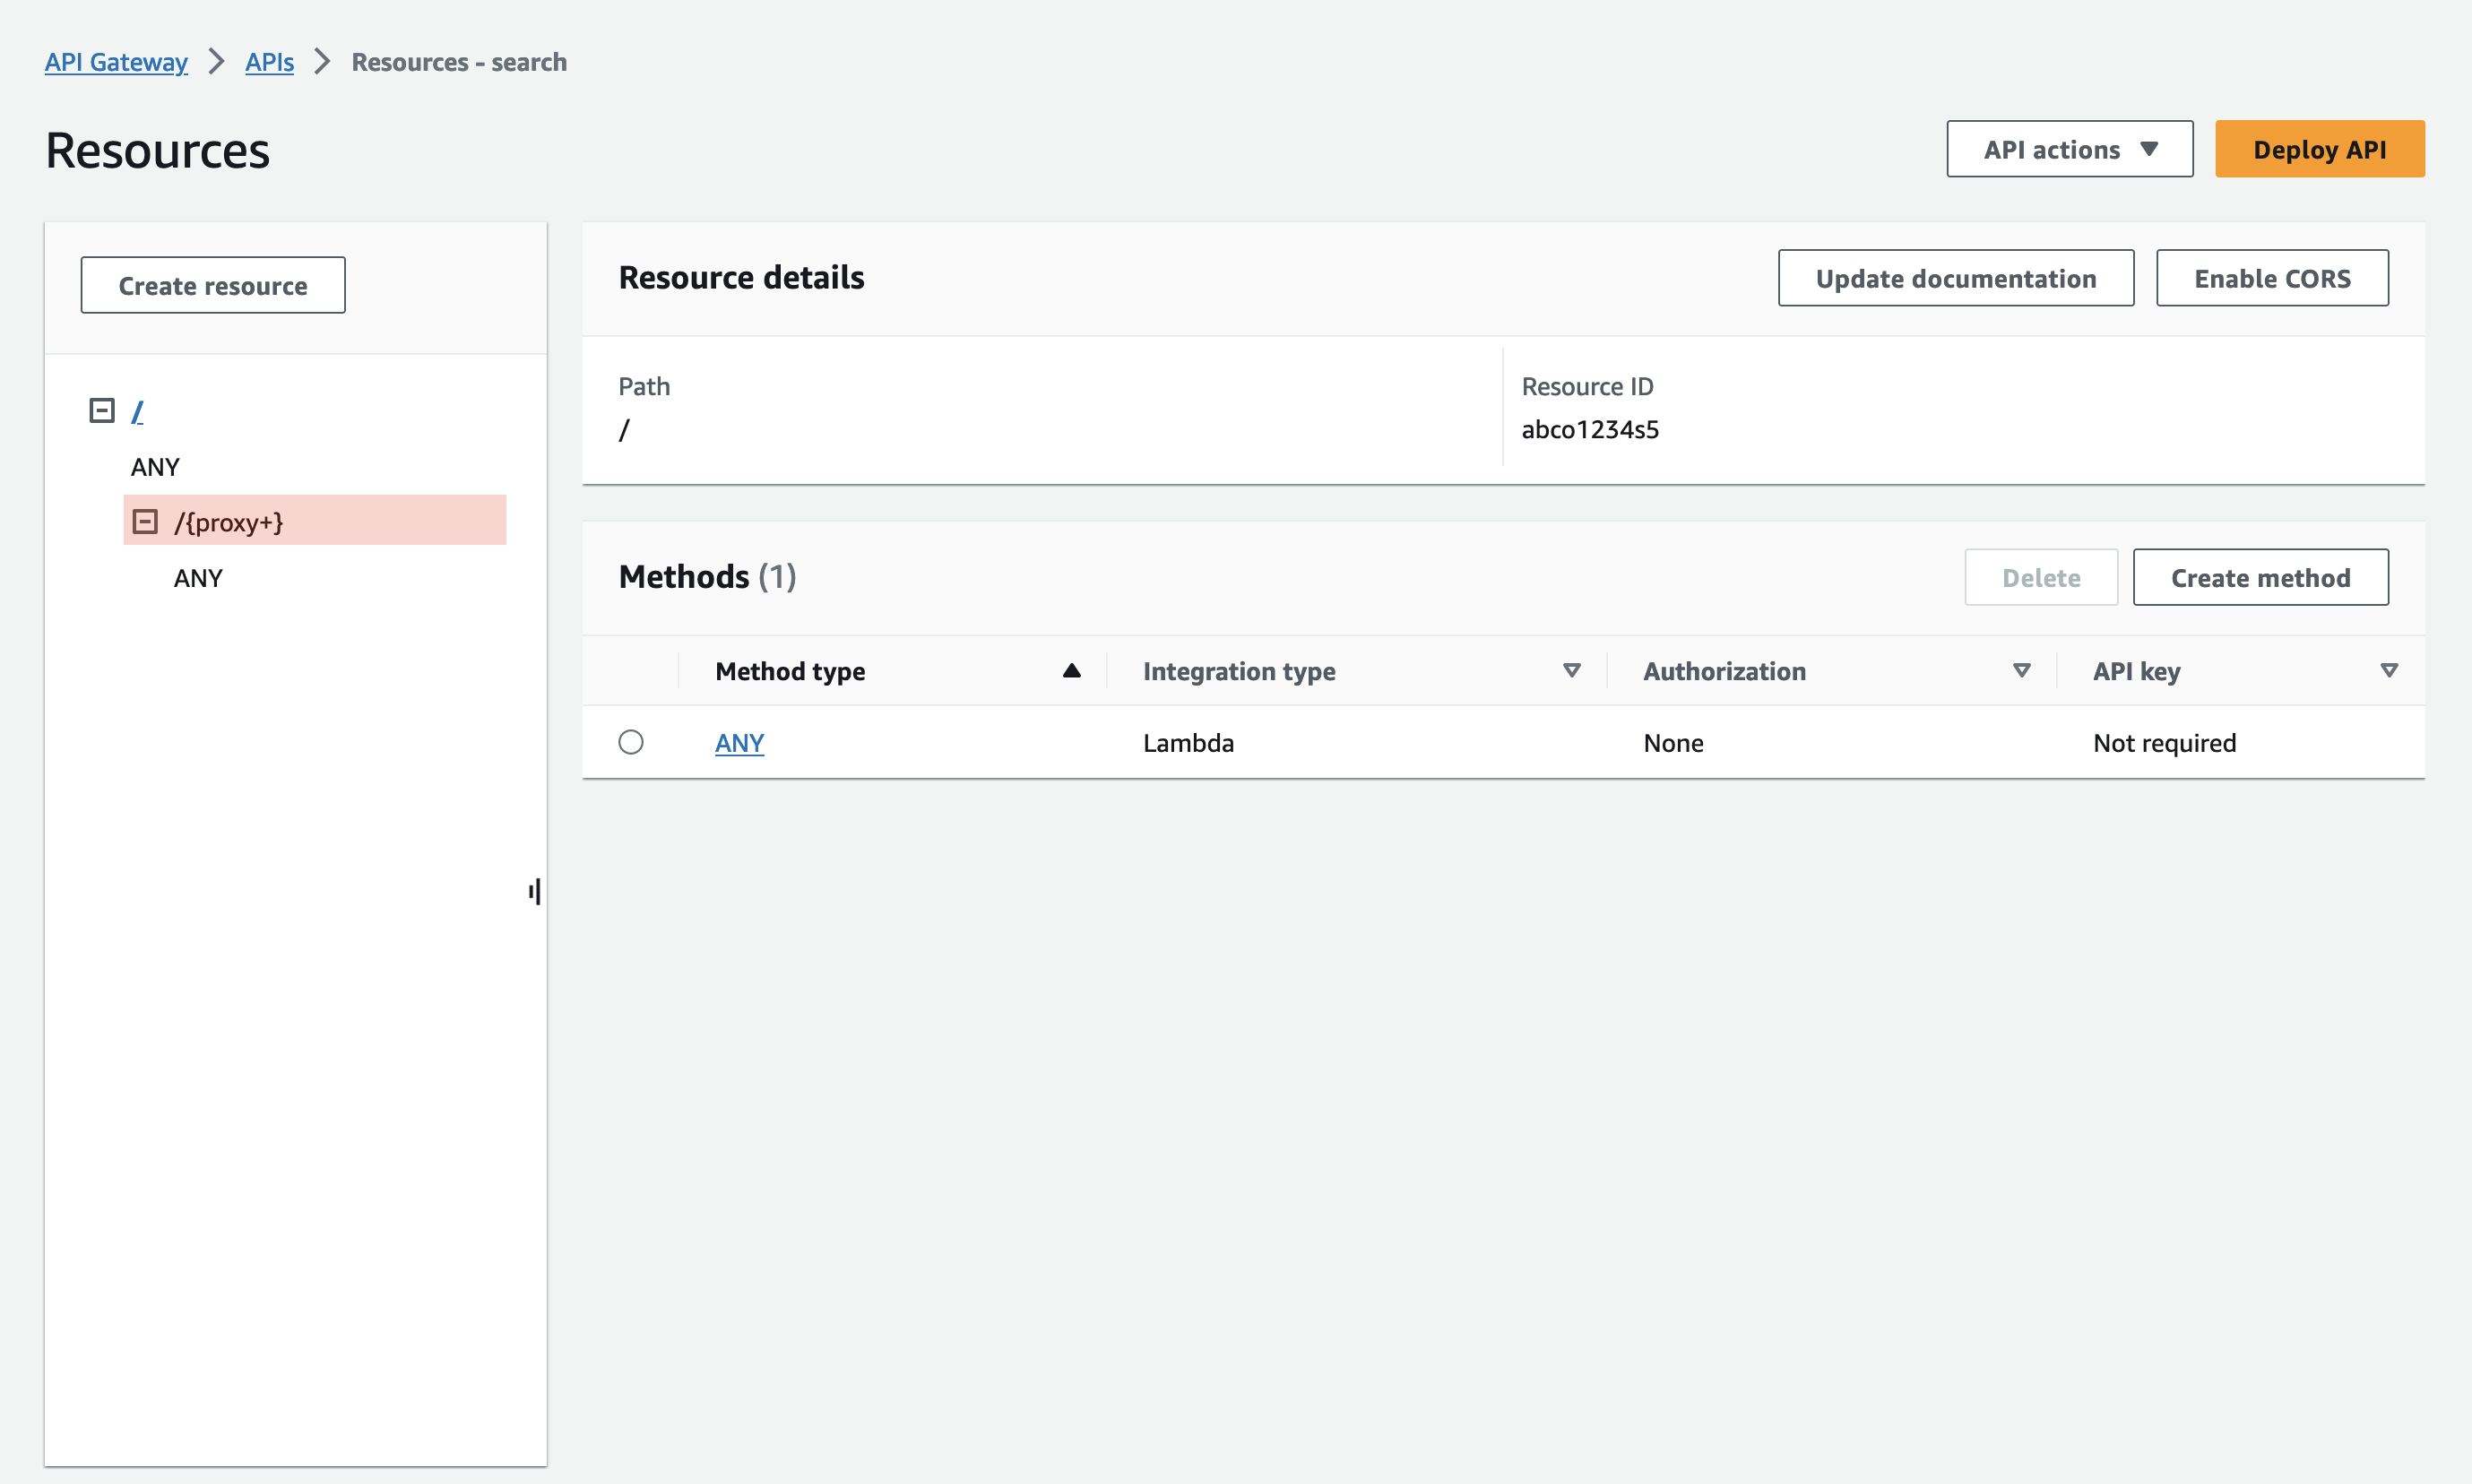
The highlighted {proxy+} catches all paths and passes them on to the Lambda request.
Binary Types
You need to ensure API Gateway treats all content as binary content. The Lambda returns base64 binary content and some of the content from ElasticSearch is already compressed (gzip).
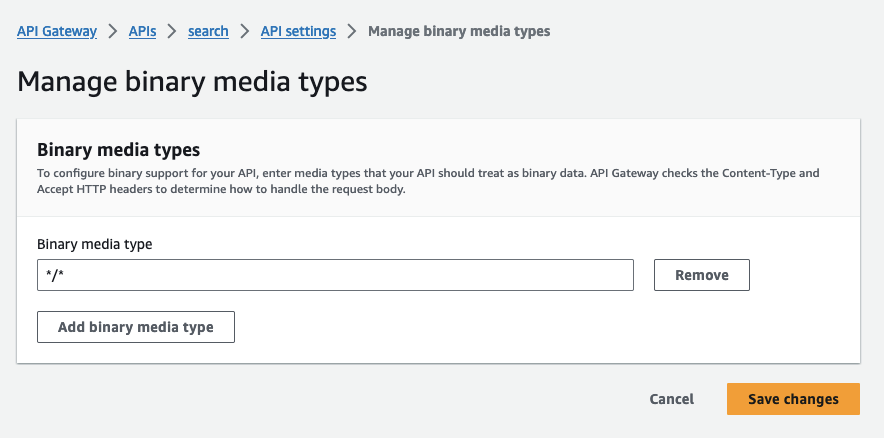
By defining all content as binary, the API Gateway won’t attempt to read the Content Encoding, and will pass the body through without modification.

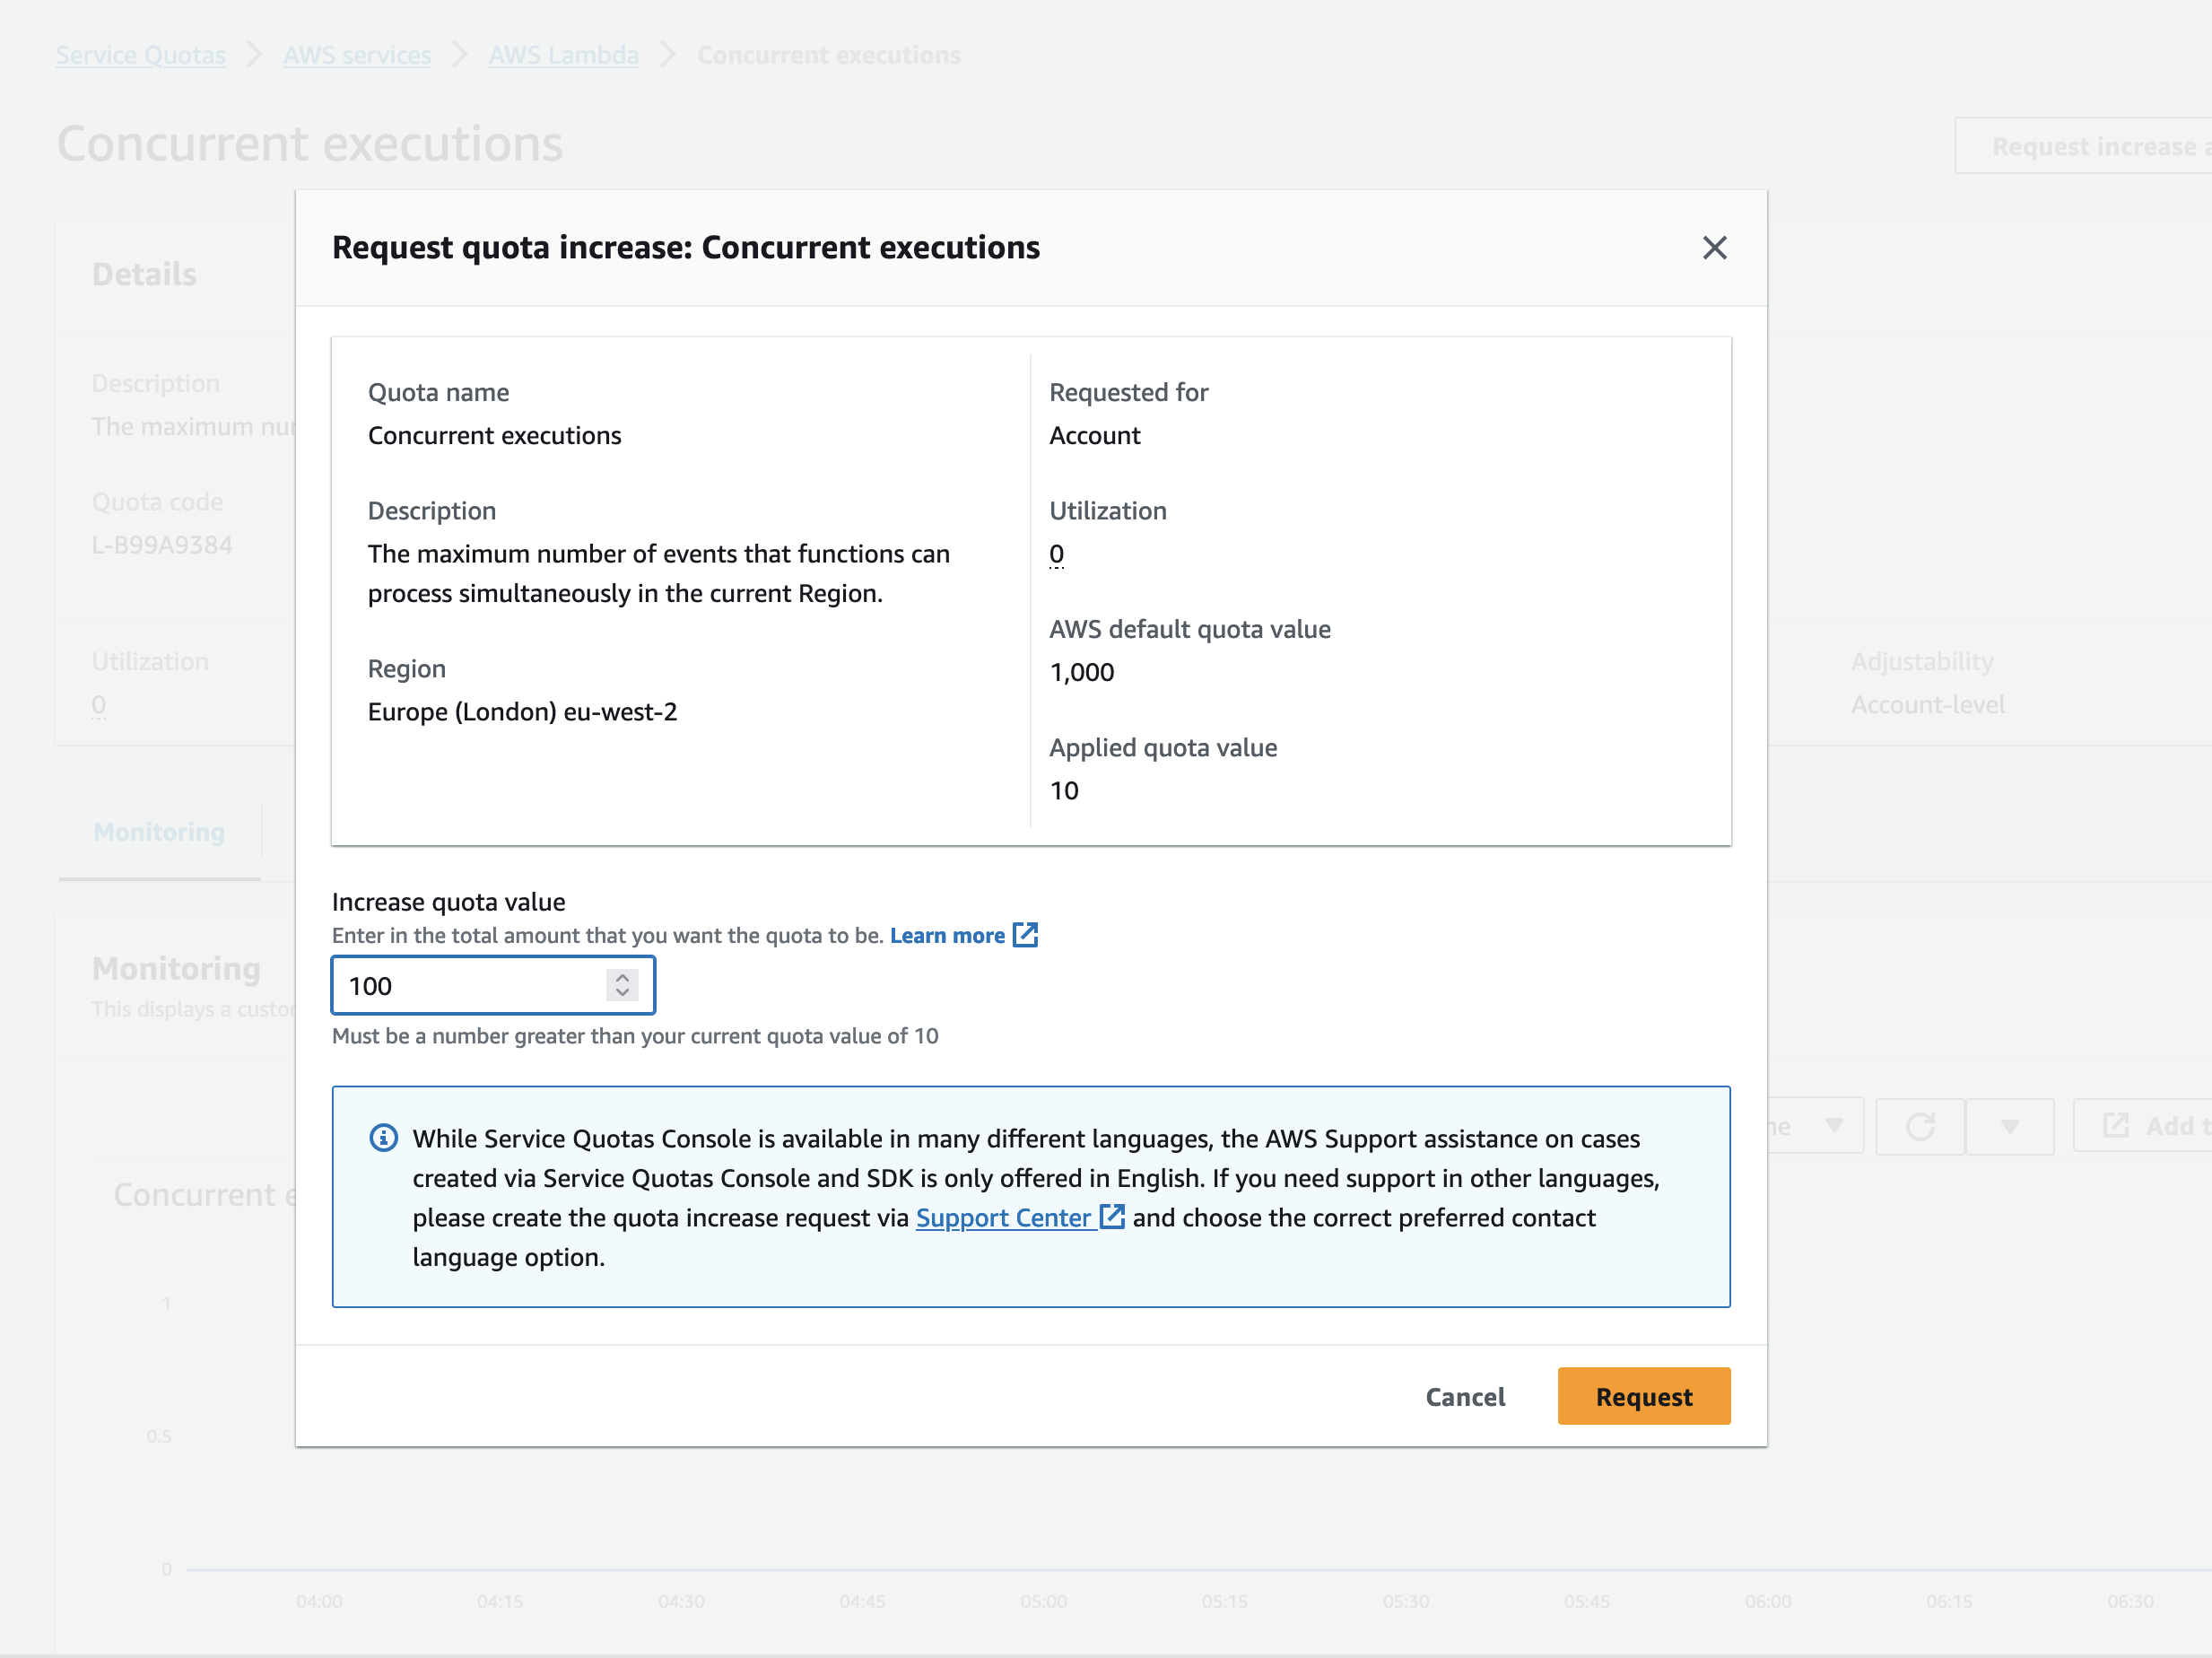
Increase Lambda Concurrency Quota
All requests are proxied through the Lambda’s. Kibana requests a large number of Javascript files, and until cached by the browser these exceed the default concurrency limit of new AWS Accounts. So if you have a relatively new AWS account, with a concurrency limit of 10, you can request this to be higher. Alternatively, it means you’ll get a few 502 errors until your browser has cached all of the javascript files.
To put in a request for more Lambda Concurrency (click on your account on the top right of the AWS Interface -> Service Quota).
IAM Setup
Add AWSLambdaVPCAccessExecutionRole to your Lambda Invocation Role
EC2 Security Group
To enable inbound connectivity to the EC2 instance you’ll need to update the security group to permit inbound connectivity from the Lambda in the VPC. To do this you can give the Lambda a different security group, or define the VPC CDIR block to allow inbound access (private IP block)
- CDIR block from security group eg.
172.0.0.0/16
Additional Steps
API Gateway Resource Policy
To limit IP addresses that can access the instance at the API Gateway level, you can define a Resource Policy:
{
  "Version": "2012-10-17",
  "Statement": [
    {
      "Effect": "Allow",
      "Principal": "*",
      "Action": "execute-api:Invoke",
      "Resource": "arn:aws:execute-api:us-east-1:{account id}:{gateway id}/*",
      "Condition": {
        "IpAddress": {
          "aws:SourceIp": "{ip address}"
        }
      }
    }
  ]
}
An implicit denial occurs when there is no applicable Deny statement but also no applicable Allow statement. Because an IAM principal is denied access by default, they must be explicitly allowed to perform an action. Otherwise, they are implicitly denied access.
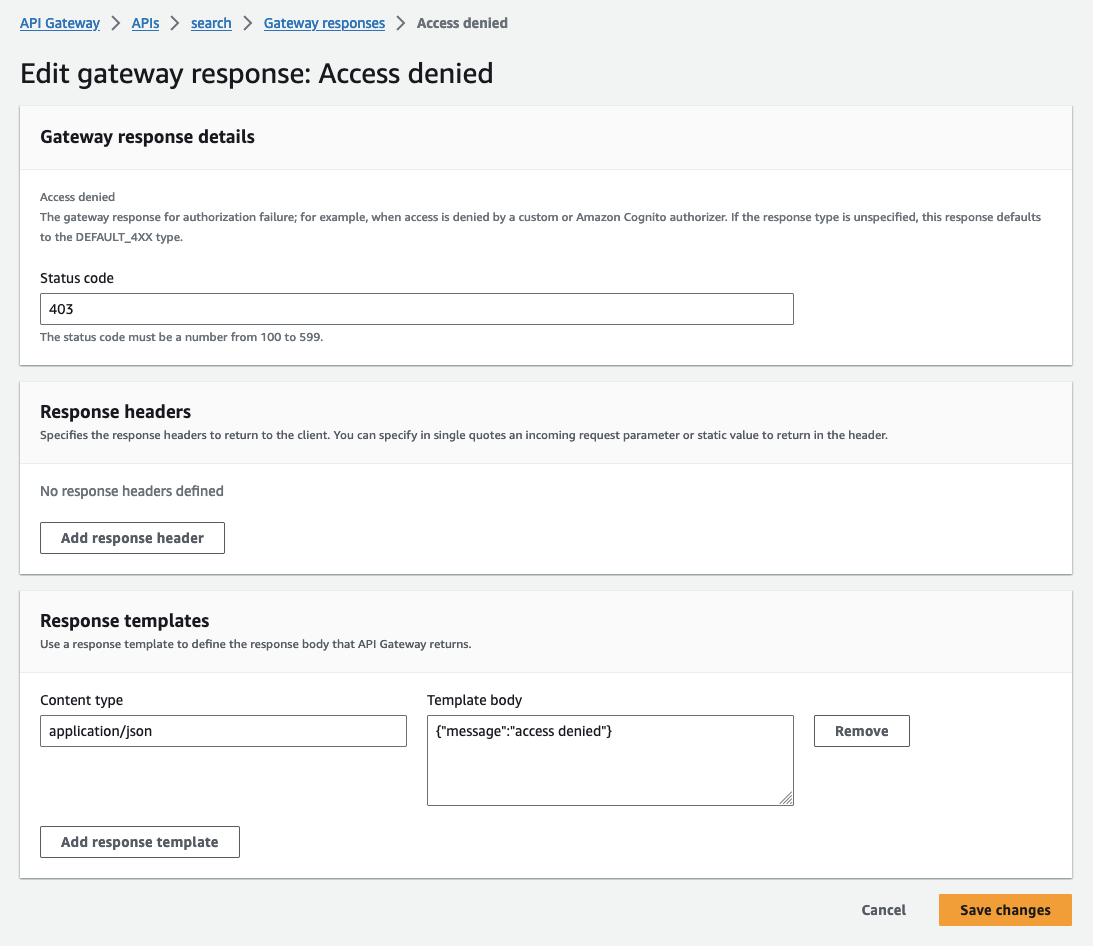
Custom Gateway Response
You can define custom responses for when the API Gateway or the Lambda rejects the request. This improves security and prevents any AWS content from being displayed in the response object (eg. account or lambda identifiers). In the API Gateway responses:
Cost
This is a cost efficient way of experimenting with ElasticSearch, utilising AWS services to persist data while not in use.
Total cost
Total cost to run a testing ElasticSearch server, using API Gateway, Lambdas, EC2 (t4g.medium) with 30GB of storage, for 200 hours a month, would cost roughly nine dollars ($9) per month
Picked 200, as there’s roughly 4.3 weeks in a month, and for 5 working days with 200 hours of available use / 4.3 weeks / 5 working days = 9 hours of use per working day. Also it’s even cheaper, if you only turn it on when needed. With the EBS data at rest you can pick up from where you left off.
Cost Breakdown
EC2 Instance (t4g.medium)
- 1 instances x 0.0336 USD On Demand hourly cost x 200 hours in a month = 6.720000 USD
- On-Demand instances (monthly): 6.72 USD
EBS Storage (30Gb Provisioned GP3)
- 3,000 iops / 30 GB = 100.00 IOPS to GB ratio (gp3)
- 125 MBps / 3,000 iops = 0.04 IOPS to Throughput ratio
- 1 volumes x 730 instance hours = 730.00 total instance hours
- 730.00 instance hours / 730 hours in a month = 1.00 instance months
- 30 GB x 1.00 instance months x 0.08 USD = 2.40 USD (EBS Storage Cost)
- EBS Storage Cost: 2.40 USD
Lambdas
Free - if you stay within the free tier. Otherwise increment at $0.0000166667 for every GB-second of use and $0.20 per 1M requests.
The Lambda free tier includes 1M free requests per month and 400,000 GB-seconds of compute time per month
API Gateway Cache (Optional)
You could add an API Gateway Cache for the Javascript files for viewing Kibana more frequently, but I’m not sure it’s beneficial for a small amount of users (<5 users). If you wanted to scale this approach a small cache would be beneficial in reducing the load on the AWS Lambdas.
- 0.02 USD per hour x 730 hours in a month = 14.60 USD for cache memory (0.5mb)
- Dedicated cache memory total price: 14.60 USD
Notes
Kibana uses a lot of Javascript files, which will exceed the AWS Lambda 6mb response if you read the content (deflate) within the Lambda execution. This is overcome as all of the Headers are passed through (such as Content-Encoding).
Kibana uses cookies for authenticate, populating the Set-Cookie header field. This comes back as an array but needs some parsing to become a valid AWS API Gateway Header.
I’ve made use of Firefox containers throughout this project, I’d recommend reading my previous post, Managing multiple AWS accounts with Firefox Containers
If you have any questions or feedback, let me know, ryan@mccaffers.com
Thanks!